
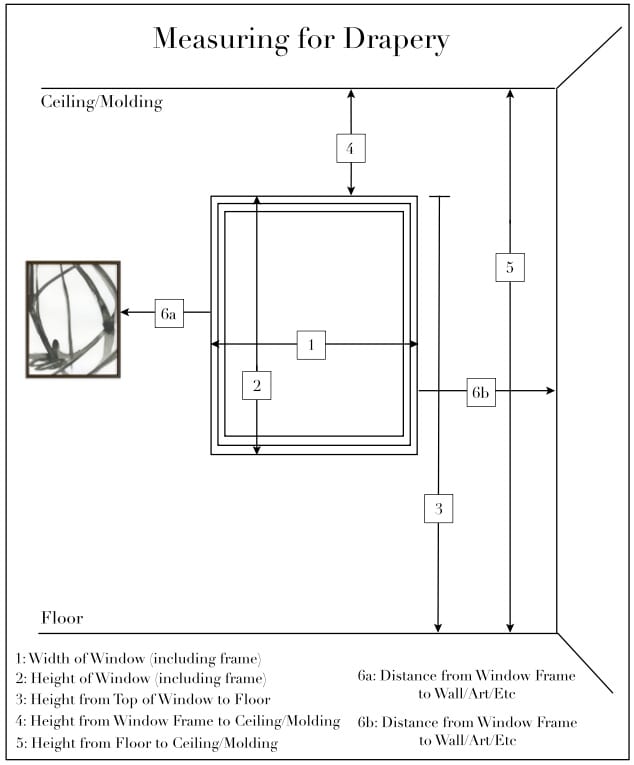
MEASURING FOR DRAPES
Measuring Help for Drapes:
FOLLOW OUR STEP-BY-STEP INSTRUCTIONS
STEP 1: SELECT TOTAL DRAPERY WIDTH COVERAGE
PAIR (2 Equal Panels)
Measure the width of the area you would like to cover. This is your ordering width. If your panels will be functional, add an additional 5" to each panel for fullness. Tips: We recommend whenever possible to extend out from the edges of your window or doors as much as 6” – 12” on each side. This will help make the area look larger, and will also maintain as much natural light as possible.
STEP 2: SELECT FINISHED DRAPERY LENGTH
• Take the measurement from the top of where you will mount the hardware to the floor (for wall mount) or from ceiling to floor (for ceiling mount). Take into account your ring size as well. The drapes will drop to the floor based on the diameter of you ring.
Be sure to measure the projection of your molding if any, to take into account for your hardware. Be sure to use a bracket with an adequate projection.
Rings Needed per Panel Style (without a return):
Amount is Per Pair of Panels
Flat Panel-
48” Width – 20 rings
75” Width – 32 rings
102” Width– 44 rings
Pleated Panels:
24” Width – 14 rings
34” Width – 20 rings
40" Width – 28 rings
WhipStitch Panels:
29" Width - 16 rings
43" Width - 24 rings
57" Width - 30 rings
Rings and all hardware are sold separately here
Grommets are not listed on the site, but are an option as well. Please e-mail or call us for a custom quote on Panels with Grommets. We would need the following information:
Color and size of the rod in which you are installing.
MEASURING FOR VALANCES
Valance Measuring Instructions
Measuring for your valance is quite easy. Measure the width you would like to cover. This is typically the width of the window including any molding around the window. We suggest adding 2”-3” to your measurement (if wall space allows). Keep in mind, if you will be layering the valance over blinds or drapes, as you will need to make sure you add enough width and projection to go past any rods etc.
Select the projection of the board, either 3 ½”, 4 ½” or 5 ½”. Most will use the standard 3 ½” unless they have wide blinds or draperies under the valance. The projection of the board is the same as the depth of the board. You will need a wider depth, or projection to mount the board over rods etc.
Recommended Projections:
3 ½” – No other window treatment
4 ½” – blinds OR drapes
5 ½” – blinds AND drapes
PLEASE NOTE:
If you are measuring for a triple window valance, please measure the center window section for the window which you are ordering for, and provide the width while ordering. The reason for this is so that the center pleat of fabric will be centered with the center window.
MEASURING FOR ROMAN SHADES
Roman Shade Measuring Instructions
HOW TO MEASURE FOR ROMAN SHADES:
SIMPLY FOLLOW OUR STEP-BY-STEP INSTRUCTIONS, AND YOUR BEAUTIFUL NEW SHADES WILL SOON BE ENHANCING YOUR HOME OR WORK SPACE FOR MANY YEARS TO COME.
Inside Mount:
- Mounted inside your window’s frame
- Provides a clean, built-in look
- Leaves attractive woodwork exposed
- Please see minimum depth requirements for each system
Step 1:
Because not all windows are perfect rectangles, we recommend measuring the window in 3 places to get your width: across the top, middle and bottom. Round all measurements to the nearest 1/8”. Take the smallest number. This is your ordering width. We will make the necessary deductions.
Step 2:
Finding the length is a similar process, measuring the length of the window in 3 places on the window: left, center, and right. Round al measurements to the nearest 1/8”. Take the largest number. This is your ordering length.
Note: Complete blackout will not be achieved
Outside Mount:
- Mounted outside or on top of the window’s frame
- Provides a taller, more dramatic appearance
- There is no minimum depth requirement
Step 1:
Measure the width of the area you wish to cover. If space allows, we recommend adding 1”-2” (1/2" - 1” to each side) to this measurement to help eliminate light seepage. This is your ordering width and will be the overall measurement of the shade.
Step 2:
Measure the height of the area you wish to cover. This is your ordering length. We recommend installing the shade 4"-5" above the window if space allows. If you are measuring the exact window, molding to molding, the shade needs to be installed directly onto the molding.
Note: For outside mount shades in the classic style with the fabric valance, please note the valance will be 1” wider than your ordered with due to returns.
Roman Shade Depth Requirements
