Skip to content

INSTALLATION

FOLLOW OUR STEP-BY-STEP INSTRUCTIONS.

Please call us at (866) 709-6058, or e-mail us at [email protected] for any assistance or questions.

Drapery Installation Instructions

Simply follow our step-by-step instructions and your beautiful new drapery will soon be enhancing your home or workspace for many years to come.

Getting started:
Please read through all instructions carefully before you begin installation. Carefully remove your new draperies from their packaging. Use caution, as drapery hooks have been pre-inserted into drapery.

Note: If you receive draperies with a leading edge decorative border, left panels will have the border down the right side of the drapery, and the right panel will have the border along the left side.

Installing Your Draperies:
Note: Drapery rods need to be installed prior to installing any drapes.

1. With drapery hooks already installed, insert drapery hooks through the eyelets of the rings.

2. Once you have inserted the hooks in all the rings, slide each individual ring onto the drapery rod and let your drapery hang.

3. Begin to shape folds. To achieve the best look, folds should occur every two rings. This will allow the drapery to stack properly and gain memory.

4. Repeat the same steps for all other panels.

Dressing Your Drapery:
Once your draperies are installed, most wrinkles and folds will hang out on their own. You may also use a garment/commercial steamer to help eliminate wrinkles. Please keep in mind the silks and linens in particular will characteristically have wrinkles regardless of steaming or pressing.

Note: All of our draperies are hand-pressed prior to shipping, however due to transit, some additional wrinkling may occur. Prior to hanging your draperies you may want to lay them out and press out wrinkles gently with a cool iron.

If the drapery is dusty, simply vacuum over it using an upholstery attachment. For cleaning soiled spots, we recommend dry cleaning.

Contact us for assistance, visit our website at premiercurtainstudio.com or contact the help desk: (866)709-6058.

Steaming Your Drapes:
Not all fabric responds well to steaming to remove wrinkles. Some, particularly delicate fabrics like silk, run the risk of shrinking and water stains or other damage. Commercial relaxing sprays can also be used instead of steaming but they can cause spotting. Use sprays sparingly and test on a small less noticeable area first.

Following are guidelines for steaming draperies. If in doubt, do not steam a fabric.

  • Linen – Wrinkling is an inherent characteristic of linen which is part of the natural beauty. Do not steam! Steaming causes shrinkage or lengthening.
  • Cotton – It is generally safe to steam cotton lightly. Heavy steam may shrink fabric.
  • Polyester / Cotton – Usually responds well to steam but you should not steam textured polyester / cotton fabrics.
  • Silk – Steaming can spot or mark fabric. Gentle steaming may be applied to the reverse side of fabric but it is safer not to steam at all.
  • Velvet and Chenille – Should not be steamed with a standard hand steamer because it can leave marks on the fabric. Use an “iron shoe” attachment available for irons to help protect the fabric when steam is applied.
  • Sheers – Some sheers respond well to steam at low temperatures. Apply light steam to sheer voiles. Do not steam textured sheers as it may change the texture of the fabric.

TIPS
Steam fabrics as carefully as possible by keeping some distance between the steamer head and the fabric.

It’s always best to steam fabrics from the backside.

Use the minimum amount of steam necessary focusing on the wrinkled areas of the curtain.

Use distilled water. Tap and bottled water contain minerals and impurities that may mark or spot the fabric.

Wear an oven mitt on your free hand and place it behind the curtain to offer support to the fabric while steaming.

When ironing delicate fabrics, place a soft cloth between the iron and the curtain fabric for added protection.

Cleaning – Draperies will provide you with years of beauty with minimal care and cleaning.

Vacuum using a brush or dust head attachment.

Dust lightly with a soft, clean cloth.

Dry clean your draperies for a more thorough cleaning.

Do not immerse your treatments in water or liquid chemicals of any kind.

Hardware Installation Instructions

Thank you for purchasing your new decorative rods. With proper installation and care, they will provide you with many years of beauty and trouble-free use. Clean with a soft cloth. Do not use harsh or abrasive cleaning supplies or polishes which may damage the finish.

Tips for Successful Installation:
Securely attach all brackets to the mounting surface. If you do not locate and install into wood studs, use the proper wall fasteners and / or plastic anchors designed for your particular mounting surface (screws and plastic anchors are included). When drilling into metal, use self-tapping screws (not included).

Make certain all brackets line up evenly by measuring their placement.

If using plastic expansion anchors, pre-drill holes using 3/16″ drill bit. If drilling directly into a stud or wood trim, pre-drill holes with 3/32″ drill bit. Attach the bracket mounting base using the screws provided.

Screw on the decorative portion of the bracket to the mounting base until it is tight and the open side of bracket faces up to the ceiling. If the cup does not end facing up, loosen the screw to adjust.

Tools Needed for Installation (not included):

  • Tape Measure
  • Phillips screwdriver
  • Pencil
  • Drill with 3/16″ drill bit to pre-drill for plastic expansion anchors
  • Level (recommended)

Finials, Rings and Pole Attachment:
If using rings, slide the appropriate number onto the pole, or slide the drapery treatment directly onto the pole.

Attach the finials to the pole and tighten the set screws with the Allen Wrench provided on the finial base by hand to complete the finial installation. NOTE: Some finials may have an inset screw in order to tighten it to the pole. For those designs, use the Allen Wrench provided with those finials.

End Bracket Installation:
Locate all brackets and correct anchors for your wall type.

Once the bracket position is determined, remove the round silver mounting base by unscrewing it from the back of the bracket and use it as a guide to mark the location on the wall for the anchors or screws.

Dressing Your Draperies:
Once the draperies are hanging, draw the panel across the pole, towards the stack side, one ring at a time to create folds to either the front or the back according to the drapery style. Pleated styles are generally pulled forward while the spaces between the pleats are pushed to the rear.

Working down the panel follow the fabric folds from the top to the bottom of the curtain, using the fabric design or seams as a guide.

With the draperies stacked, loop a paper band or strip of fabric around the panel near the center and another one near the bottom to hold the pleats in place. Leave the bands on for a couple of days to train the panel to fold properly.

Center Bracket Installation:
When center supports are required, be certain to install the center brackets level with the outside brackets. Follow the same instructions as end brackets above

When using one center support, place it at the center of the window between the two end brackets. When using two center supports, install them an equal distance apart between the two end brackets. If using two center supports, the draperies will not be functional. Rings or grommets cannot pass through or over support brackets.

Place the pole onto the mounting brackets. The pole should extend 1″ – 2″ past each end bracket. The last ring should be placed on the outside end of the end brackets.

Tighten the set screws on the brackets with the Allen Wrench provided to lock the pole into place.

NOTE: The mounting brackets can be adjusted to provide a 3 1⁄2″ to 5 1⁄2″ projection from the wall to allow for the appropriate size drapery return. Hang the draperies onto the pole / rings as required by the style ordered.

Cordless Roman Shade Installation Instructions

Simply follow our step-by-step instructions and your beautiful new shades will soon be enhancing your home or workspace for many years to come.

Shades need to be unpacked and installed as soon as they arrive. 

Getting Started:
Carefully unpack your shades and check to make sure you have the following installation parts. We recommend reading through these instructions before starting the installation.

Tools You Will Need:

  • Power drill with a:
    • 1/8" bit (outside mount)
    • Phillips bit (both inside and outside mount)
  • Extension bit (optional)
  • Phillips screwdriver
  • Metal tape measure
  • Pencil

Parts Included:

  • Screws
  • Mounting brackets (only needed for outside mount)

Please note that your brackets must be securely attached to the mounting surface. If your screws do not hit wood studs you’ll have to use a different fastener which can be found at any local hardware store. *
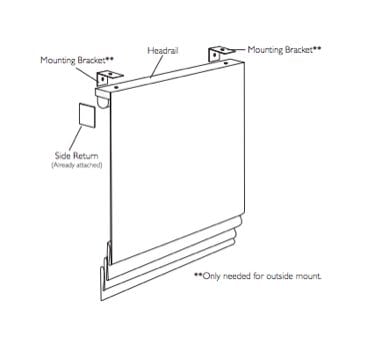
screen-shot-2017-12-13-at-12.08.03-pm
screen-shot-2017-12-13-at-12.08.09-pm

Mounting Your Shades:
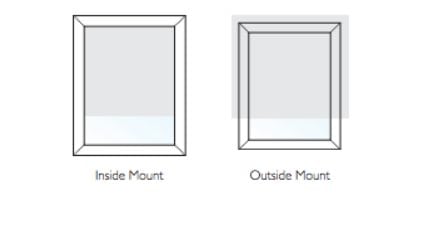
Inside Mount: The mounting holes are pre-drilled through the headrail. Start the screws into the mounting holes and tighten until the tips of the screws are slightly showing on the top of the headrail. Hold the shade inside the window frame. If possible, the front of the shade should be even with the front edge of the window frame. The shade should be centered within the window frame. With the shade properly positioned, push up on the headrail allowing the screw tips to leave a small indention on the window frame. Now drill a hole with a 1/8" drill bit at the indentions. Finish the job by attaching the screws in the headrail into the pre-drilled holes.

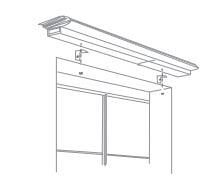
Outside Mount: The shades are to be attached to the window frame or wall with the mounting brackets included. The brackets need to be placed so they will not interfere with the shade’s operating mechanism. Attach the brackets to the wall or window frame at the desired height. Attach the brackets using the long screws provided, making sure the brackets are level with each other. Set the headrail on the brackets. Center the shade back against the wall or window frame. Mark hole and pre-drill using 1/8" drill bit at each bracket location. Attach the shade to the brackets using the short screws provided.

Operation:
Please always use the ring pull to operate your roman shade. Please do not pull on the hem of your roman shade to operate. Raising the shade: Gently pull the ring downward and then guide the roman shade upward to the desired location. Once at desired location, gently pull the ring downward to lock it. Lowering the shade: Gently pull the ring downward to the desired location and then release the shade with a gentle upward movement until it locks in place.
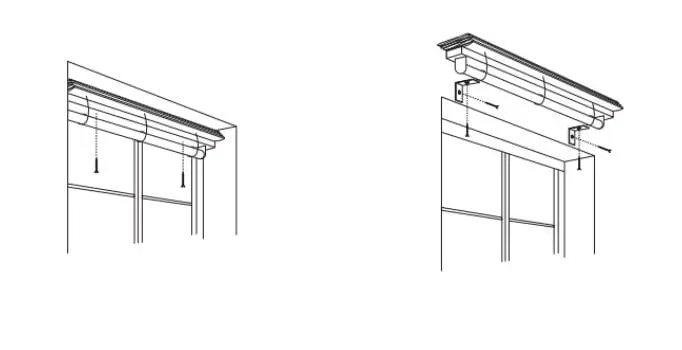
screen-shot-2017-12-13-at-12.08.15-pm

Adjusting The Tension On Your Shade:
If your roman shade has too much tension (springs up too quickly) or too little (does not reach the top), the level of tension can be adjusted. Begin by locating the acrylic tension dial on you roman shade’s headrail as shown in the picture below. Note: Your tension dial may be on the left. In this case, rotation directions will be opposite as shown.

  1. Raise your roman shade completely.
  2. Hold the tube with one hand to secure it so that it does not rotate.
  3. Rotate the tension dial in the appropriate direction as shown in the pictures above.
  4. Test the shade to ensure it is now at the desired setting. Repeat if necessary

Care and Cleaning:
Minimal care and cleaning is needed to maintain the beauty of your shades.

  • To vacuum: Use a hand held, low suction vacuum.
  • To dust: Use a soft, clean cloth or a feather duster.

If the shades are in need of a more thorough cleaning, then have them professionally cleaned. Never immerse the shades in liquid of any type.

If you need any assistance with installing, please reach out to us at (866)709-6058 or e-mail us at [email protected].

According to the Window Covering Manufacturers Association Inc., all labels must not be removed from the product.

Continuous Loop/Cord Lock Roman Shade Installation Instructions

Shades need to be unpacked and installed as soon as they arrive. 

How to Install Continuous Loop and Cord Lock Roman Shades:
Simply follow our step-by-step instructions and your beautiful new shades will soon be enhancing your home or workspace for many years to come.

Getting Started:
Carefully unpack your shades and check to make sure you have the following installation parts. We recommend reading through these instructions before installation.

Parts Included:

    • Screws
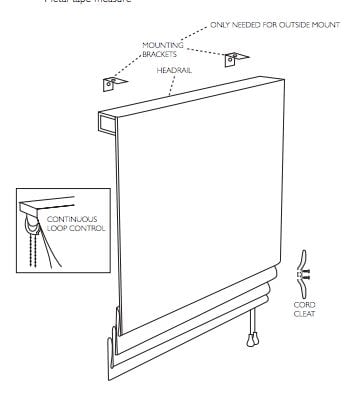
    • Mounting Brackets (Only Needed For Outside Mount)

*Please note that your brackets must be securely attached to the mounting surface. If your screws do not hit wood studs you’ll have to use a different fastener which can be found at any local hardware store.

*According to the Window Covering Manufacturers Association Inc., all labels must not be removed from the product

screen-shot-2017-12-13-at-3.48.48-pm
screen-shot-2017-12-13-at-2.29.46-pm

Tools You Will Need:

  • Drill with a 1/8” bit and a hex head and/or Philips bit
  • Screwdriver
  • Metal tape measurer

Mounting Your Shades - Inside Mount:
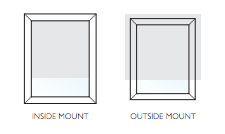
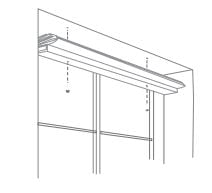
The mounting holes are pre-drilled through the headrail. Start the screws into the mounting holes and tighten until the tips of the screws are slightly showing on the top of the headrail. Hold the shade inside the window frame. If possible, the front of the shade should be even with the front edge of the window frame. The shade should be centered within the window frame. With the shade properly positioned, push up on the headrail allowing the screw tips to leave a small indention on the window frame. Now drill a hole with a 1/8” drill bit at the indentions. Finish the job by attaching the screws in the headrail into the pre-drilled holes.

screen-shot-2017-12-13-at-4.39.21-pm

Mounting Your Shades - Outside Mount:
The shades are to be attached to the window frame or wall with the mounting brackets included. The brackets need to be placed so they will not interfere with the shade’s operating mechanism. Attach the brackets to the wall or window frame at the desired height. Attach the brackets using the long screws provided, making sure the brackets are level with each other. Set the headrail on the brackets. Make sure the draw cords move freely around the mounting brackets. Center the shade back against the wall or window frame. Mark the hole and pre-drill using a 1/8” drill bit at each bracket location. Attach the shade to the brackets using the short screws provided. For shades with loop control, attach the shade to the brackets with a single short screw in the front hole of the bracket only.

screen-shot-2017-12-13-at-4.40.19-pm
screen-shot-2017-12-14-at-10.39.29-am

Attaching the Cord Cleat:
If you have small children, you should install the cord cleat to keep the control out of harm’sway. Simply mount the cord cleat to the wall or window frame next to the shade with the screws provided. Mount the cord cleat at a safe height, taking into account furniture or other objects upon which a child can climb. Then, after each use of the shade, simply drape the excess cord around the cleat.

Tips:
If the shade will not raise or lower, make sure the draw cords are not caught under the mounting brackets or screws. If only one side of the shade moves when the cords are pulled, make sure the shade is not caught on an obstruction, such as a window crank, latch, etc.

Headboard Installation Instructions

Please note:

-  This assembly process is a two-person job.

-  One person should hold the headboard steady while the other follows the assembly instructions.

  • You will need a standard screwdriver to tighten screws.
  • Your headboard includes four screws.
  • If you have any questions, please contact customer service at (866)709-6058

Getting Started:
Carefully unpack your headboard and check to make sure you have the following installation parts. We recommend reading through these instructions before installation.

Parts Included:

    • 4 Screws


Tools You Will Need:

  • Philips Screwdriver

To attach your headboard please follow these instructions:

  1. Remove previous bed or bed frame if any, to make space for your new headboard.
  2. Carefully remove your new headboard from the packaging.
  3. Line up the bed frame to the right side of the headboard leg.
  4. Align a provided screw into the bed frame and headboard leg.
  5. Tighten the screw.
  6. Repeat steps 3-5 for the left side of the headboard.
  7. Once the screws are secured on both sides, the headboard and bed frame are properly attached.

Mounting Your Shades - Outside Mount:
The shades are to be attached to the window frame or wall with the mounting brackets included. The brackets need to be placed so they will not interfere with the shade’s operating mechanism. Attach the brackets to the wall or window frame at the desired height. Attach the brackets using the long screws provided, making sure the brackets are level with each other. Set the headrail on the brackets. Make sure the draw cords move freely around the mounting brackets. Center the shade back against the wall or window frame. Mark the hole and pre-drill using a 1/8” drill bit at each bracket location. Attach the shade to the brackets using the short screws provided. For shades with loop control, attach the shade to the brackets with a single short screw in the front hole of the bracket only.

screen-shot-2017-12-14-at-10.39.29-am

Attaching the Cord Cleat:
If you have small children, you should install the cord cleat to keep the control out of harm’sway. Simply mount the cord cleat to the wall or window frame next to the shade with the screws provided. Mount the cord cleat at a safe height, taking into account furniture or other objects upon which a child can climb. Then, after each use of the shade, simply drape the excess cord around the cleat.

Tips:
If the shade will not raise or lower, make sure the draw cords are not caught under the mounting brackets or screws. If only one side of the shade moves when the cords are pulled, make sure the shade is not caught on an obstruction, such as a window crank, latch, etc.

Traverse System Installation Instructions
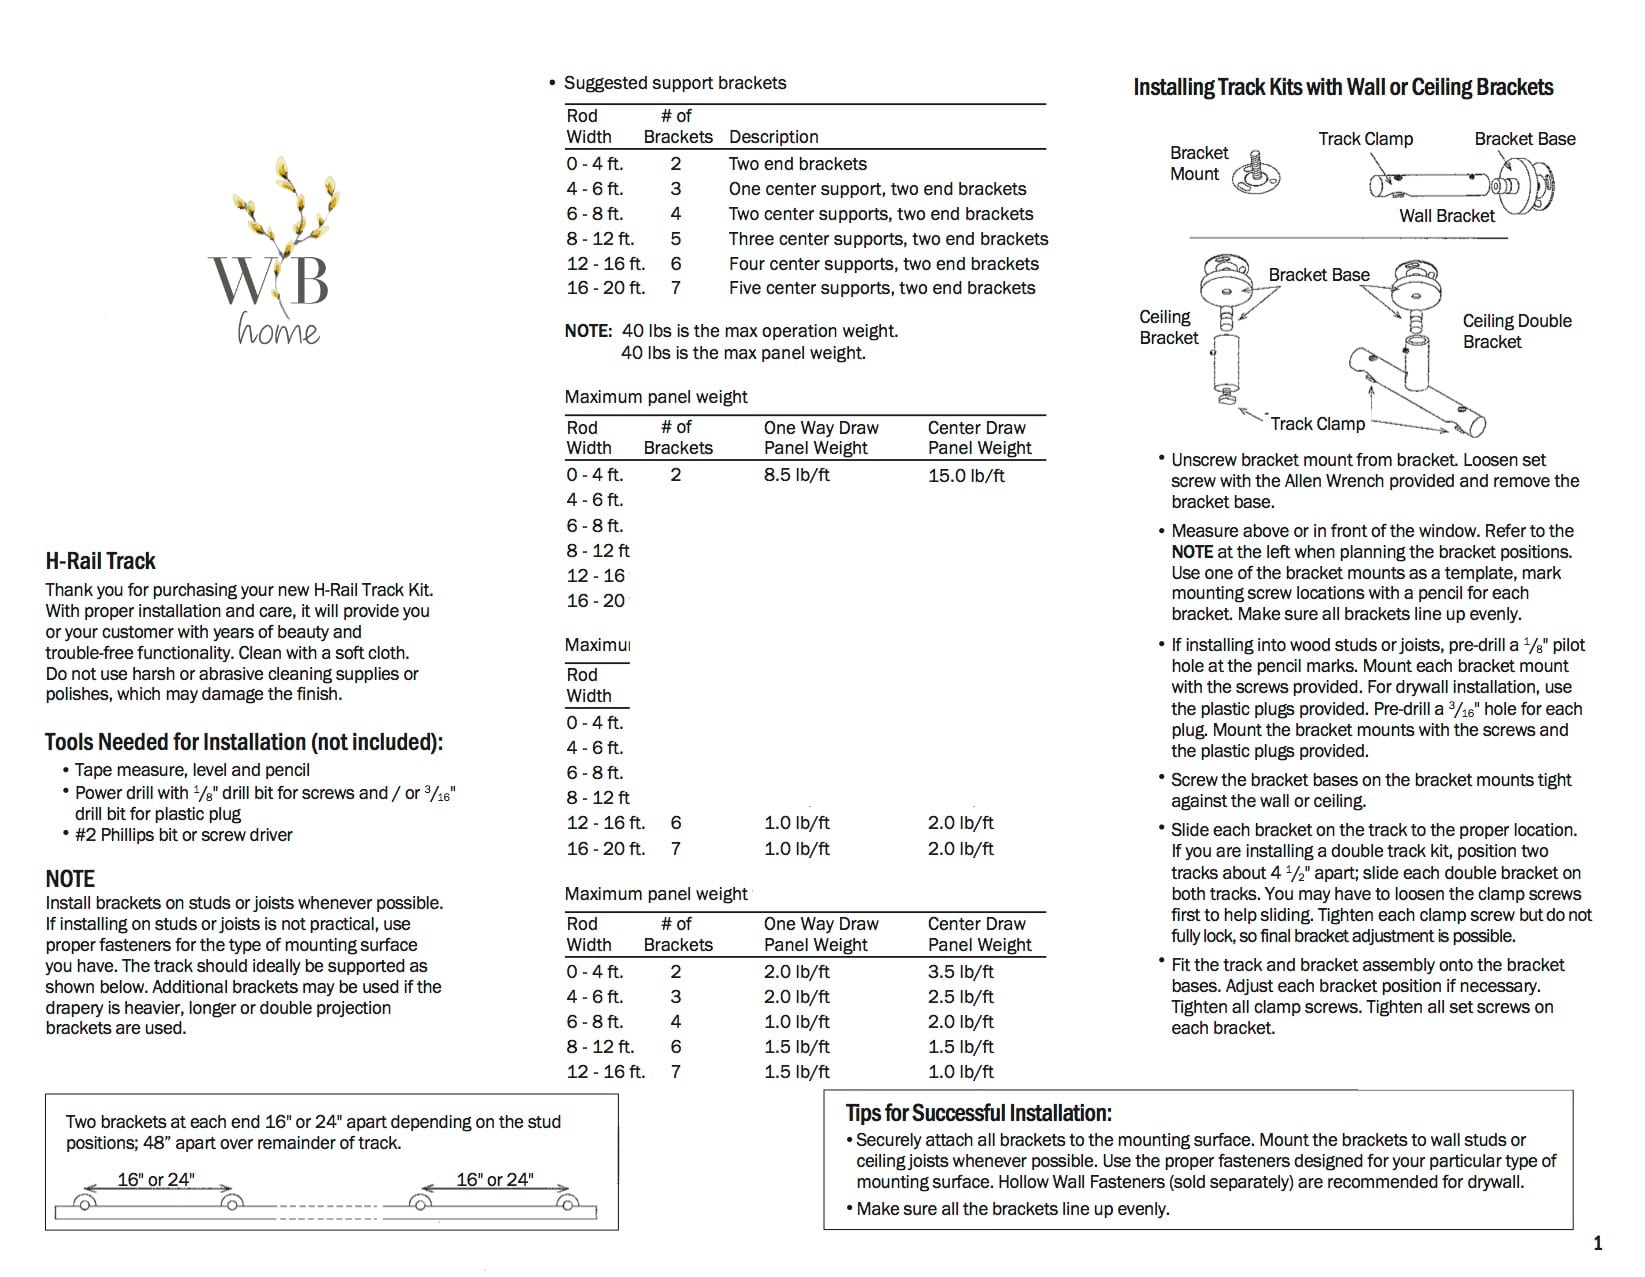
Willow Bloom Home Traverse Installation Instructions

Leave a Comment

You must be logged in to post a comment.

0
Scroll To Top